
GhostBSD Cara Memasang Google Chrome dan Microsoft Edge
Secara default, sistem FreeBSD tidak menyertakan repositori Google Chrome dan Microsoft Edge dalam ports sistem maupun paket pkg. Kedua program tersebut dapat dijalankan di FreeBSD dengan bantuan Linux Binary.
Dalam artikel ini, kita akan mempelajari cara menginstal dan mengonfigurasi peramban web Google Chrome dan Microsoft Edge. Karena kedua program ini hanya dapat dijalankan di Linux, disarankan agar Anda membaca artikel sebelumnya mengenai instalasi Linux Binary di FreeBSD.
Jika Anda belum membaca artikel tersebut, jangan lanjutkan membaca artikel ini. Seluruh isi artikel ini dijalankan menggunakan FreeBSD Desktop GhostBSD 23.06.01, yaitu Sistem Operasi BSD desktop yang sederhana dan elegan.
Sebagai bahan referensi bacaan, Anda dapat membaca artikel sebelumnya:
Cara Konfigurasi Emulator Biner Linux Di FreeBSD.
A. Konfigurasi Ubuntu
Secara default, GhostBSD sudah dilengkapi dengan program Binary Linux dan Ubuntu, sehingga Anda hanya perlu menyesuaikan beberapa skrip agar Google Chrome dan Microsoft Edge dapat berjalan di GhostBSD. Langkah pertama yang harus dilakukan adalah mengganti file skrip /usr/local/etc/rc.d/ubuntu.
root@ns3:~ # cd /usr/local/etc/rc.d
root@ns3:/usr/local/etc/rc.d # cp ubuntu ubuntu.back
root@ns3:/usr/local/etc/rc.d # rm -f ubuntu
Skrip di atas bertujuan untuk mencadangkan file Ubuntu menjadi ubuntu.back lalu menghapus file Ubuntu tersebut. Setelah Anda menghapus file Ubuntu bawaan dari GhostBSD, buatlah file Ubuntu baru dan masukkan skrip di bawah ini.
root@ns3:/usr/local/etc/rc.d # touch ubuntu
root@ns3:/usr/local/etc/rc.d # ee ubuntu

#!/bin/sh
#
# PROVIDE: ubuntu
# REQUIRE: archdep mountlate
# KEYWORD: nojail
#
# This is a modified version of /etc/rc.d/linux from FreeBSD 12.2-RELEASE
#
. /etc/rc.subr

name="ubuntu"
desc="Enable Ubuntu chroot, and Linux ABI"
rcvar="ubuntu_enable"
start_cmd="${name}_start"
stop_cmd=":"

unmounted()
{
	[ 'stat -f "%d" "$1"` == 'stat -f "%d" "$1/.."' -a \
	  'stat -f "%i" "$1"` != 'stat -f "%i" "$1/.."' ]
}

ubuntu_start()
{
	local _emul_path _tmpdir

	load_kld -e 'linux(aout|elf)' linux
	case 'sysctl -n hw.machine_arch' in
	amd64)
		load_kld -e 'linux64elf' linux64
		;;
	esac
	if [ -x @CHROOT_PATH@/sbin/ldconfigDisabled ]; then
		_tmpdir=`mktemp -d -t linux-ldconfig`
		@CHROOT_PATH@/sbin/ldconfig -C ${_tmpdir}/ld.so.cache
		if ! cmp -s ${_tmpdir}/ld.so.cache @CHROOT_PATH@/etc/ld.so.cache; then
			cat ${_tmpdir}/ld.so.cache > @CHROOT_PATH@/etc/ld.so.cache
		fi
		rm -rf ${_tmpdir}
	fi

	# Linux uses the pre-pts(4) tty naming scheme.
	load_kld pty

	# Handle unbranded ELF executables by defaulting to ELFOSABI_LINUX.
	if [ 'sysctl -ni kern.elf64.fallback_bran' -eq "-1" ]; then
		sysctl kern.elf64.fallback_brand=3 > /dev/null
	fi

	if [ 'sysctl -ni kern.elf32.fallback_brand' -eq "-1" ]; then
		sysctl kern.elf32.fallback_brand=3 > /dev/null
	fi
	sysctl compat.linux.emul_path=/compat/ubuntu

	_emul_path="/compat/ubuntu"
	unmounted "${_emul_path}/proc" && (mount -t linprocfs linprocfs "${_emul_path}/proc" || exit 1)
	unmounted "${_emul_path}/sys" && (mount -t linsysfs linsysfs "${_emul_path}/sys" || exit 1)
	unmounted "${_emul_path}/dev" && (mount -t devfs devfs "${_emul_path}/dev" || exit 1)
	unmounted "${_emul_path}/dev/fd" && (mount -o linrdlnk -t fdescfs fdescfs "${_emul_path}/dev/fd" || exit 1)
	unmounted "${_emul_path}/dev/shm" && (mount -o mode=1777 -t tmpfs tmpfs "${_emul_path}/dev/shm" || exit 1)
	unmounted "${_emul_path}/tmp" && (mount -t nullfs /tmp "${_emul_path}/tmp" || exit 1)
	unmounted /dev/fd && (mount -t fdescfs null /dev/fd || exit 1)
	unmounted /proc && (mount -t procfs procfs /proc || exit 1)
	true
}

load_rc_config $name
run_rc_command "$1"
Kemudian, pasang sistem file di direktori yang telah dibuat sebelumnya.
root@ns3:~ # mount -t linprocfs linprocfs /compat/ubuntu/proc
root@ns3:~ # mount -t linsysfs linsysfs /compat/ubuntu/sys
root@ns3:~ # mount -t devfs devfs /compat/ubuntu/dev
root@ns3:~ # mount -o linrdlnk -t fdescfs fdescfs /compat/ubuntu/dev/fd
root@ns3:~ # mount -o mode=1777 -t tmpfs tmpfs /compat/ubuntu/dev/shm
root@ns3:~ # mount -t nullfs /home /compat/ubuntu/home
root@ns3:~ # mount -t nullfs /tmp /compat/ubuntu/tmp
Lanjutkan dengan menginstal debootstrap linux-steam-utils.
root@ns3:~ # pkg install debootstrap linux-steam-utils
Setelah itu, Anda dapat melanjutkan dengan menginstal dan mengonfigurasi lingkungan Linux berbasis Ubuntu (versi bionic atau focal).
root@ns3:~ # debootstrap --arch=amd64 --no-check-gpg focal /compat/ubuntu
root@ns3:~ # printf 'deb http://archive.ubuntu.com/ubuntu/ focal multiverse main universe restricted\n' > /compat/ubuntu/etc/apt/sources.list
root@ns3:~ # printf 'deb http://archive.ubuntu.com/ubuntu/ focal-updates main restricted universe multiverse\n' >> /compat/ubuntu/etc/apt/sources.list
root@ns3:~ # printf 'deb http://archive.ubuntu.com/ubuntu/ focal-security main restricted universe multiverse\n' >> /compat/ubuntu/etc/apt/sources.list
root@ns3:~ # printf '0.0 0 0.0\n0\nUTC\n' > /compat/ubuntu/etc/adjtime
Setelah itu, lanjutkan dengan skrip di bawah ini untuk melakukan perbaikan pada repositori Ubuntu.
root@ns3:~ # cd /compat/ubuntu/lib64/
root@ns3:/compat/ubuntu/lib64 # rm ./ld-linux-x86-64.so.2
root@ns3:/compat/ubuntu/lib64 # ln -s ../lib/x86_64-linux-gnu/ld-2.31.so ld-linux-x86-64.so.2
Buat entri startup di file /etc/rc.conf agar daemon Ubuntu dapat berjalan secara otomatis saat komputer dimatikan atau dimulai ulang.
root@ns3:~ # sysrc ubuntu_enable=YES
Berikan izin akses file pada file /usr/local/etc/rc.d/ubuntu dan mulai ulang Ubuntu.
root@ns3:~ # chmod +x /usr/local/etc/rc.d/ubuntu
root@ns3:~ # service ubuntu restart
compat.linux.emul_path: /compat/ubuntu -> /compat/ubuntu
Langkah selanjutnya adalah melakukan update dan upgrade serta instalasi beberapa program Ubuntu.
root@ns3:/compat/ubuntu/lib64 # chroot /compat/ubuntu /bin/bash
root@ns3:/# dpkg-reconfigure locales
root@ns3:/# dpkg-reconfigure tzdata
Current default time zone: 'Asia/Jakarta'
Local time is now:      Sat Aug 19 13:30:37 WIB 2023.
Universal Time is now:  Sat Aug 19 06:30:37 UTC 2023.
root@ns3:/# apt update
root@ns3:/# apt upgrade
root@ns3:/# apt install -y pulseaudio
root@ns3:/# apt install -y fonts-symbola
root@ns3:/# apt install -y gnupg
root@ns3:/# exit
Agar suara dapat berfungsi pada aplikasi yang terinstal di lingkungan Ubuntu, Anda harus menggunakan server pulseaudio. Buatlah skrip berikut di dalam berkas /compat/ubuntu/usr/local/bin/pulseaudio.
root@ns3:~ # ee /compat/ubuntu/usr/local/bin/pulseaudio
#!/bin/sh

get_pa_sock_path()
{
    PA_SOCK_PATH=$(sockstat | awk -v me=$(whoami) -F'[ \t]+' '
        $1 == me && $2 == "pulseaudio" && $6 ~ /native/ {
            print $6;
            exit 0
        }'
    )
}

get_pa_sock_path
if [ ! -S "$PA_SOCK_PATH" ]; then
    while killall pulseaudio; do
        sleep 0.5
    done
    pulseaudio --start
    get_pa_sock_path
fi
[ -S "$PA_SOCK_PATH" ] && export PULSE_SERVER=unix:$PA_SOCK_PATH

START_SCRIPT=$1
shift
$START_SCRIPT $*

root@ns3:~ # chmod +x /compat/ubuntu/usr/local/bin/pulseaudio
Sampai di sini, instalasi Ubuntu di FreeBSD telah selesai. Sekarang Anda dapat menginstal berbagai aplikasi Ubuntu di FreeBSD.
B. Instalasi dan Konfigurasi Google Chrome
Langkah pertama untuk menginstal Google Chrome adalah mengunduh program tersebut. Ikuti petunjuk di bawah ini untuk mengunduh Google Chrome.
root@ns3:~ # printf "deb [arch=amd64] http://dl.google.com/linux/chrome/deb/ stable main" > /compat/ubuntu/etc/apt/sources.list.d/google-chrome.list
root@ns3:~ # fetch -o /tmp/ https://dl.google.com/linux/linux_signing_key.pub
/tmp/linux_signing_key.pub                              14 kB 3016 kBps    00s
Setelah itu, instal berkas tersebut di lingkungan Ubuntu.
root@ns3:/# chroot /compat/ubuntu /bin/bash
root@ns3:/# apt-key add /tmp//linux_signing_key.pub
OK
root@ns3:/# apt update
root@ns3:/# apt install -y google-chrome-stable
root@ns3:/# exit
Setelah itu, buat skrip di dalam file/berkas /usr/local/share/applications/linux-chrome.desktop.
root@ns3:~ # ee /usr/local/share/applications/linux-chrome.desktop

[Desktop Entry]
Type=Application
Version=1.0
Encoding=UTF-8
Name=Google Chrome
Comment=unixwinbsd.blogspot.com
Icon=/compat/ubuntu/opt/google/chrome/product_logo_16.png
Exec=/usr/local/bin/linux-chrome
Categories=Application;Network;WebBrowser;
MimeType=text/html;text/xml;application/xhtml+xml;x-scheme-handler/http;x-scheme-handler/https;x-scheme-handler/ftp;
StartupNotify=true
Lanjutkan dengan membuat skrip lain di file /usr/local/bin/linux-chrome.
root@ns3:~ # ee /usr/local/bin/linux-chrome

#!/bin/sh

chroot_path=/compat/ubuntu

get_pa_sock_path()
{
        PA_SOCK_PATH=$(sockstat | awk -v me=$(whoami) -F'[ \t]+' '
                $1 == me && $2 == "pulseaudio" && $6 ~ /native/ {
                        print $6;
                        exit 0
                }'
        )
}

get_pa_sock_path
if [ ! -S "$PA_SOCK_PATH" ]; then
        while killall pulseaudio; do
                sleep 0.5
        done
        pulseaudio --start
        get_pa_sock_path
fi
[ -S "$PA_SOCK_PATH" ] && export PULSE_SERVER=unix:$PA_SOCK_PATH
${chroot_path}/bin/chrome
Buat izin akses untuk file tersebut.
root@ns3:~ # chmod +x /usr/local/share/applications/linux-chrome.desktop
root@ns3:~ # chmod +x /usr/local/bin/linux-chrome
Akhirnya, instalasi Google Chrome di GhostBSD telah selesai. Untuk menjalankan Google Chrome, Anda cukup mengeklik menu aplikasi pada desktop GhostBSD.
C. Instalasi dan Konfigurasi Microsoft Edge
Peramban web Edge adalah program buatan Microsoft, Inc. Program ini diciptakan untuk menggantikan Internet Explorer, yang telah lama menyertai Microsoft Windows 95 dan Windows XP. Sama halnya dengan program Google Chrome, Microsoft Edge dapat diinstal pada sistem berbasis Linux.
Bagi para penggemar FreeBSD, jangan khawatir; dengan bantuan binary Linux, program ini dapat berjalan dengan normal dan lancar. Berikut adalah cara menginstal Microsoft Edge di GhostBSD.
root@ns3:~ # chroot /compat/ubuntu /bin/bash
root@ns3:/# apt install -y apt-transport-https curl pgp
root@ns3:/# apt install software-properties-common apt-transport-https wget
root@ns3:/# wget -q https://packages.microsoft.com/keys/microsoft.asc -O- | sudo apt-key add -
OK
root@ns3:/# add-apt-repository "deb [arch=amd64] https://packages.microsoft.com/repos/edge stable main"
root@ns3:/# apt update
root@ns3:/# apt install microsoft-edge-stable
root@ns3:/# exit
Setelah itu, masukkan skrip berikut ke dalam file /usr/local/share/applications/linux-edge.desktop.
root@ns3:~ # ee /usr/local/share/applications/linux-edge.desktop
[Desktop Entry]
Type=Application
Version=1.0
Encoding=UTF-8
Name=Microsoft Edge
Comment=unixwinbsd.blogspot.com
Icon=/compat/ubuntu/opt/microsoft/msedge/product_logo_128.png
Exec=/usr/local/bin/linux-edge
Categories=Application;Network;WebBrowser;
MimeType=text/html;text/xml;application/xhtml+xml;x-scheme-handler/http;x-scheme-handler/https;x-scheme-handler/ftp;
StartupNotify=true
Kemudian, buat file /usr/local/bin/linux-edge dan masukkan skrip di bawah ini.
root@ns3:~ # ee /usr/local/bin/linux-edge
#!/bin/sh

chroot_path=/compat/ubuntu

get_pa_sock_path()
{
	PA_SOCK_PATH=$(sockstat | awk -v me=$(whoami) -F'[ \t]+' '
		$1 == me && $2 == "pulseaudio" && $6 ~ /native/ {
			print $6;
			exit 0
		}'
	)
}

get_pa_sock_path
if [ ! -S "$PA_SOCK_PATH" ]; then
	while killall pulseaudio; do
		sleep 0.5
	done
	pulseaudio --start
	get_pa_sock_path
fi
[ -S "$PA_SOCK_PATH" ] && export PULSE_SERVER=unix:$PA_SOCK_PATH
${chroot_path}/opt/microsoft/msedge/msedge
Langkah terakhir adalah memulai ulang (restart/reboot) komputer Anda.
root@ns3:~ # reboot
Jalankan Microsoft Edge hingga muncul gambar seperti di bawah ini.
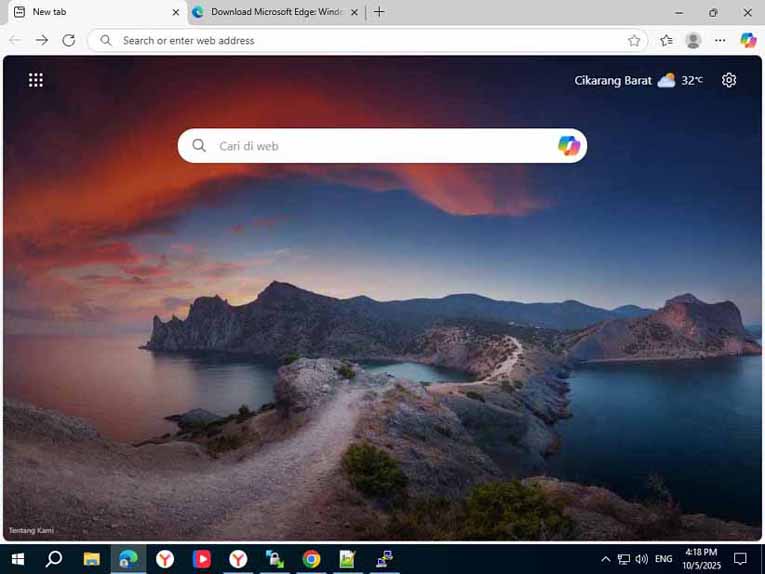
Jika tampilannya seperti gambar di atas, berarti Microsoft Edge sedang berjalan. Jika gambar di atas tidak muncul, ganti skrip /usr/local/bin/linux-edge dengan skrip di bawah ini.
root@ns3:~ # ee /usr/local/bin/linux-edge
#!/compat/ubuntu/bin/bash

export START_PATH="/opt/microsoft/msedge/msedge"
export CHROME_WRAPPER="`readlink -f "$0"`"
export LD_LIBRARY_PATH=/usr/local/steam-utils/lib64/fakeudev
export LD_PRELOAD=/usr/local/steam-utils/lib64/webfix/webfix.so
export LIBGL_DRI3_DISABLE=1

exec -a "$0" "$START_PATH" --no-sandbox --no-zygote --test-type --v=0 "$@"
Instalasi dan konfigurasi Microsoft Edge telah selesai. Kini server FreeBSD Anda dapat menjalankan program Ubuntu, yaitu Microsoft Edge dan Google Chrome.
Jadi, bagi Anda penggemar FreeBSD, jangan berkecil hati, salah satu keunggulan FreeBSD adalah kemampuannya menjalankan aplikasi Ubuntu dengan bantuan Linux Binaries.