
Tutorial FreeBSD Menyiapkan PyroCMS CMS PHP Untuk Laravel Framework
Laravel adalah salah satu framework aplikasi web paling populer untuk bahasa pemrograman PHP. Aplikasi ini memiliki sintaksis yang ekspresif dan elegan dan pengembangannya telah menjadi pengalaman yang luar biasa. Dengan Laravel, para pengembang dapat dengan mudah membangun situs web dengan cepat dan efisien.
Sementara itu, PyroCMS dibangun dengan Laravel dan terasa seperti ekstensi dan memudahkan untuk membangun situs web dan aplikasi yang lebih baik dengan cepat. PyroCMS bukan hanya sistem manajemen konten tetapi juga mesin dan platform pengembangan yang kuat dan modern.
Sistem Manajemen Konten (CMS) ini sering digunakan oleh para bloger pemula hingga profesional. PyroCMS menggunakan framework yang populer sehingga mudah dipahami.
PyroCMS adalah aplikasi sistem manajemen konten berorientasi objek sumber terbuka yang dibuat menggunakan bahasa PHP dan Laravel. PyroCMS mudah digunakan, tampak hebat, dan menggunakan beberapa caching yang cerdas agar semuanya berjalan lancar. PyroCMS dapat dengan mudah diperluas dengan Modul, Widget, dan Plugin yang mudah dibuat dan dapat disesuaikan dengan Tema.
Menurut situs web resmi PyroCMS, berikut adalah fitur utama CMS ini.
- Dibuat dengan bahasa PHP yang telah terbukti keandalannya.
- Aplikasi OPEN SOURCE.
- Memiliki tampilan Control panel yang sangat sederhana yang dibuat berdasarkan pola dan prinsip standar seperti API.
- Control Panel yang responsif dengan manajemen konten yang mudah.
- Dukungan multibahasa.
- Pengembangan yang cepat.
A. Persyaratan sistem
Untuk menjalankan PyroCMS di FreeBSD, Anda perlu memenuhi beberapa kondisi.
- OS: FreeBSD 13.2.
- Apache version: Apache24.
- PHP-FPM.
- PHP version: PHP82.
- mod PHP82 dan PHP82 extension.
- php82-xmlwriter, php82-xmlreader, php82-fileinfo.
- mysql80-server.
B. Mengaktifkan mod_PHP Di Apache
Karena PyroCMS dibuat dengan bahasa PHP, sebagai topik utama dalam artikel ini kita akan mengaktifkan mod_PHP pada server web Apache24.
Gunakan perintah berikut untuk mulai mengaktifkan mod_PHP.
root@ns3:~ # cd /usr/ports/lang/php82
root@ns3:/usr/ports/lang/php82 # make install clean
root@ns3:/usr/ports/lang/php82 # cd /usr/ports/www/mod_php82
root@ns3:/usr/ports/www/mod_php82 # make install clean
root@ns3:/usr/ports/www/mod_php82 # cd /usr/ports/databases/php82-mysqli
root@ns3:/usr/ports/databases/php82-mysqli # make install clean
root@ns3:~ # pkg install php82-xmlwriter
root@ns3:~ # pkg install php82-xmlreader
root@ns3:~ # pkg install php82-fileinfoSetelah itu, ketik skrip berikut ke dalam file /usr/local/etc/apache24/httpd.conf.
LoadModule php_module         libexec/apache24/libphp.so


    DirectoryIndex index.php index.html


AddType application/x-httpd-php .php
AddType application/x-httpd-php .php .phtml .php3
AddType application/x-httpd-php-source .phps
Lanjutkan dengan membuat file php.ini, salin saja dari yang sudah ada.
root@ns3:/usr/ports/databases/php82-mysqli # cp /usr/local/etc/php.ini-production /usr/local/etc/php.iniKemudian Anda mengaktifkan skrip berikut.
cgi.fix_pathinfo=0Pada artikel ini kita akan mengaktifkan PHP-FPM, dengan tujuan agar proses membaca file PHP menjadi lebih cepat. Kita tidak akan membahas proses instalasi PHP-FPM. Anda dapat membaca artikel sebelumnya.
Mengkonfigurasi PHP82 PHP-FPM dan Apache24 di FreeBSD
Mulai ulang PHP-FPM dan Apache24, sehingga semua modul PHP dapat dibaca oleh Apache24.
root@ns3:~ # service apache24 restart
root@ns3:~ # service php-fpm restart
C. Cara Instal Composer PHP
Sebelum kita menginstal PHP composer, pertama-tama aktifkan mod SSL di file /usr/local/etc/php.ini. Gunakan perintah di bawah ini untuk membuat mod SSL.
root@ns3:~ # cd /etc/ssl
root@ns3:/etc/ssl # wget http://curl.haxx.se/ca/cacert.pem
Masukkan file SSL yang kita buat di atas ke dalam file /usr/local/etc/php.ini.
openssl.cafile=/etc/ssl/cacert.pemPada FreeBSD, PHP composer dapat diinstal dengan dua cara, yaitu melalui paket PKG dan curl. Untuk memudahkan, kita cukup menggunakan perintah curl.
root@ns3:/etc/ssl # cd /tmp
root@ns3:/tmp # curl -sS https://getcomposer.org/installer -o composer-setup.php
root@ns3:/tmp # php composer-setup.php --install-dir=/usr/local/bin --filename=composer
Periksa versi Composer.
root@ns3:/tmp # composer --version
Composer version 2.6.6 2023-12-08 18:32:26
D. Membuat Database MySQL
Agar PyroCMS dapat berjalan dengan sempurna, maka dibutuhkan database untuk mendukungnya. Oke, sekarang mari kita lanjutkan ke pembuatan database untuk PyroCMS. Karena yang berjalan di server FreeBSD kita adalah server MySQL, maka kita gunakan server MySQL sebagai database-nya.
root@ns3:/tmp # mysql -u root -p
Enter password:
Welcome to the MySQL monitor.  Commands end with ; or \g.
Your MySQL connection id is 12
Server version: 8.0.35 Source distribution

Copyright (c) 2000, 2023, Oracle and/or its affiliates.

Oracle is a registered trademark of Oracle Corporation and/or its
affiliates. Other names may be trademarks of their respective
owners.

Type 'help;' or '\h' for help. Type '\c' to clear the current input statement.

root@localhost [(none)]>database name: pyrocma
username: userpyrocms
Password: router123
root@localhost [(none)]> CREATE DATABASE pyrocms CHARACTER SET utf8;
Query OK, 1 row affected, 1 warning (0.13 sec)

root@localhost [(none)]> CREATE USER 'userpyrocms'@'localhost' IDENTIFIED BY 'router123';
Query OK, 0 rows affected (0.20 sec)

root@localhost [(none)]> GRANT ALL PRIVILEGES ON pyrocms.* TO 'userpyrocms'@'localhost';
Query OK, 0 rows affected (0.09 sec)

root@localhost [(none)]> FLUSH PRIVILEGES;
Query OK, 0 rows affected (0.02 sec)
E. Cara Instal PyroCMS
Instalasi terakhir yang harus kita lakukan adalah PyroCMS. Karena dalam artikel ini kita akan menggunakan Apache24, maka letakkan folder PyroCMS di /usr/local/www.
root@ns3:~ # cd /usr/local/www
root@ns3:/usr/local/www # git clone https://github.com/pyrocms/pyrocms.git
Perbarui/Update Composer.
root@ns3:/usr/local/www # cd pyrocms
root@ns3:/usr/local/www/pyrocms # composer update
root@ns3:/usr/local/www/pyrocms # composer install
Gunakan perintah berikut untuk menginstal PyroCMS.
root@ns3:/usr/local/www/pyrocms # php artisan install
The MIT License (MIT)
Copyright (c) 2018 AnomalyLabs, Inc.
Permission is hereby granted, free of charge, to any person obtaining a copy
of this software and associated documentation files (the "Software"), to deal
in the Software without restriction, including without limitation the rights
to use, copy, modify, merge, publish, distribute, sublicense, and/or sell
copies of the Software, and to permit persons to whom the Software is
furnished to do so, subject to the following conditions:
The above copyright notice and this permission notice shall be included in
all copies or substantial portions of the Software.
THE SOFTWARE IS PROVIDED "AS IS", WITHOUT WARRANTY OF ANY KIND, EXPRESS OR
IMPLIED, INCLUDING BUT NOT LIMITED TO THE WARRANTIES OF MERCHANTABILITY,
FITNESS FOR A PARTICULAR PURPOSE AND NONINFRINGEMENT. IN NO EVENT SHALL THE
AUTHORS OR COPYRIGHT HOLDERS BE LIABLE FOR ANY CLAIM, DAMAGES OR OTHER
LIABILITY, WHETHER IN AN ACTION OF CONTRACT, TORT OR OTHERWISE, ARISING FROM,
OUT OF OR IN CONNECTION WITH THE SOFTWARE OR THE USE OR OTHER DEALINGS IN
THE SOFTWARE.
Other Licenses
All add-ons are offered under their own license. Most of the add-ons available and
in our marketplace are either completely free and licensed under MIT as well, or
they are commercial add-ons and offered under our standard commercial license.
These add-ons are sold on a "per-instance" basis. This means one add-on purchase
per live site. Development copies and stages are included.

 Do you agree to the provided license and terms of service? (yes/no) [no]:
 > yes

 What database driver would you like to use? [mysql, pgsql, sqlite, sqlsrv] [mysql]:
 >

 What is the hostname of your database? [localhost]:
 >

 What is the name of your database?:
 > pyrocms

 Enter the username for your database connection [root]:
 > userpyrocms

 Enter the password for your database connection:
 > router123

 Enter the name of your application [Default]:
 >

 Enter the reference slug for your application [default]:
 >

 Enter the primary domain for your application [localhost]:
 >

 Enter the desired username for the admin user [admin]:
 >

 Enter the desired email for the admin user:
 > datainchi@gmail.com

 Enter the desired password for the admin user:
 > router123456

 Enter the default locale [en]:
 >

 Enter the default timezone [UTC]:
 >

1/61 Running core migrations.
2/61 Running application migrations.
3/61 Installing: Navigation Module
4/61 Installing: Users Module
5/61 Installing: Configuration Module
6/61 Installing: Preferences Module
7/61 Installing: Settings Module
8/61 Installing: Blocks Module
9/61 Installing: Files Module
10/61 Installing: Search Module
11/61 Installing: Pages Module
12/61 Installing: Repeaters Module
13/61 Installing: Addons Module
14/61 Installing: Dashboard Module
15/61 Installing: Posts Module
16/61 Installing: Streams Module
17/61 Installing: Variables Module
18/61 Installing: Redirects Module
19/61 Installing: XML Feed Dashboard Widget
20/61 Installing: HTML Block Extension
21/61 Installing: Throttle Security Check Extension
22/61 Installing: Default Authenticator Extension
23/61 Installing: Private Storage Adapter Extension
24/61 Installing: User Security Check Extension
25/61 Installing: Default Page Handler Extension
26/61 Installing: Page Link Type
27/61 Installing: Robots Extension
28/61 Installing: URL Link Type Extension
29/61 Installing: WYSIWYG Block Extension
30/61 Installing: Sitemap Extension
31/61 Reloading application.
32/61 Seeding: Navigation Module
33/61 Seeding: Users Module
34/61 Seeding: Configuration Module
35/61 Seeding: Preferences Module
36/61 Seeding: Settings Module
37/61 Seeding: Blocks Module
38/61 Seeding: Files Module
39/61 Seeding: Search Module
40/61 Seeding: Pages Module
41/61 Seeding: Repeaters Module
42/61 Seeding: Addons Module
43/61 Seeding: Dashboard Module
44/61 Seeding: Posts Module
45/61 Seeding: Streams Module
46/61 Seeding: Variables Module
47/61 Seeding: Redirects Module
48/61 Seeding: XML Feed Dashboard Widget
49/61 Seeding: HTML Block Extension
50/61 Seeding: Throttle Security Check Extension
51/61 Seeding: Default Authenticator Extension
52/61 Seeding: Private Storage Adapter Extension
53/61 Seeding: User Security Check Extension
54/61 Seeding: Default Page Handler Extension
55/61 Seeding: Page Link Type
56/61 Seeding: Robots Extension
57/61 Seeding: URL Link Type Extension
58/61 Seeding: WYSIWYG Block Extension
59/61 Seeding: Sitemap Extension
60/61 Running other migrations.
61/61 Running project seeds.
root@ns3:/usr/local/www/pyrocms #
Lihat hasilnya dengan membuka file /usr/local/www/pyrocms/.env.
root@ns3:/usr/local/www/pyrocms # ee .env
APP_ENV=local
INSTALLED="true"
APP_KEY=17gYmbMPAwfq0OYAwjLdOpVNXp9oYd1a
APP_DEBUG=true
DEBUG_BAR=false
DB_CONNECTION=mysql
DB_HOST=localhost
DB_DATABASE=pyrocms
DB_USERNAME=userpyrocms
DB_PASSWORD=router123
APPLICATION_NAME=Default
APPLICATION_REFERENCE=default
APPLICATION_DOMAIN=localhost
ADMIN_USERNAME=admin
ADMIN_EMAIL=datainchi@gmail.com
ADMIN_PASSWORD=router123456
APP_LOCALE=en
APP_TIMEZONE=UTC
Jalankan perintah chown dan chmod, untuk kepemilikan dan hak akses ke file.
root@ns3:/usr/local/www/pyrocms # chown -R www:www /usr/local/www/pyrocms/
root@ns3:/usr/local/www/pyrocms # chmod -R 775 /usr/local/www/pyrocms/
Konfigurasi terakhir adalah mengetik perintah berikut pada file /usr/local/etc/apache24/httpd.conf.
Alias /pyrocms "/usr/local/www/pyrocms/"
<Directory "/usr/local/www/pyrocms">
    Options Indexes MultiViews FollowSymLinks
    AllowOverride All
    Require all granted
</Directory>
Mulai ulang PHP-FPM dan Apache24.
root@ns3:~ # service apache24 restart
root@ns3:~ # service php-fpm restart
F. Jalankan Pengetesan PyroCMS
Pada tahap ini, kita akan menguji PyroCMS. Apakah ada yang salah dengan konfigurasi yang Anda lakukan di atas?.
Buka peramban web Google Chrome, ketik http://192.168.5.2/pyrocms/.
dan lanjutkan dengan membuka http://192.168.5.2/pyrocms/public/.
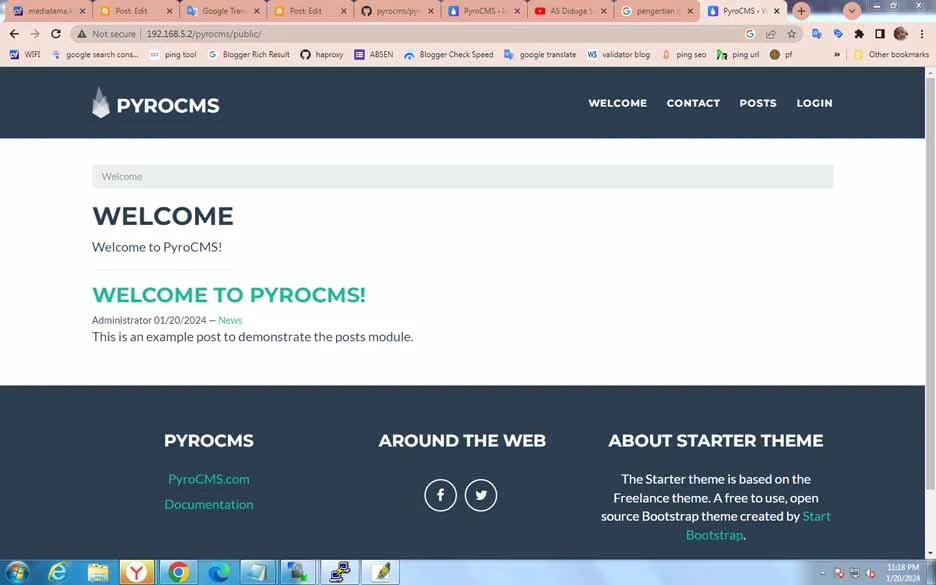
Dengan mencoba panduan dalam artikel ini, Anda dapat mempelajari lebih lanjut tentang apa itu PyroCMS, cara menginstal PyroCMS, dan menggunakan PyroCMS di Apache24. Setelah Anda memahaminya, Anda dapat menerapkan PyroCMS untuk membuat situs web atau blog.